Symfony 2.4 Tutorial :: Teil 2 Bundle und Layout
1. Bundle anlegen
In Symfony2 werden nicht wie in der alten Framework-Version "applications" angelegt sondern sogenannte "bundles". Bundles sind Plugins die alle benötigten PHP Anweisungen sowie CSS-Dateien, JavaScript-Dateien und Bilder enthalten.
In der Datei app/AppKernel.php werden die Bundles geladen.
An dieser Stelle sei erwähnt, dass die neuen (app/console) Kommandos interaktiv programmiert sind.
Das heisst es können zahlreiche Eigenschaften dem Framework über die Konsole hinzugefügt werden, wobei
dem Benutzer entsprechenden Fragen gestellt werden und es somit einfach ist schnell Controller, Models und vieles mehr zu erstellen. Wir legen jetzt ein neues Bundle mit dem Namespace Efi/BlogBundle an. Der Suffix "Bundle" ist zwinged notwendig!
Das Kommando lautet hierzu: php app/console generate:bundle --namespace=Efi/BlogBundle
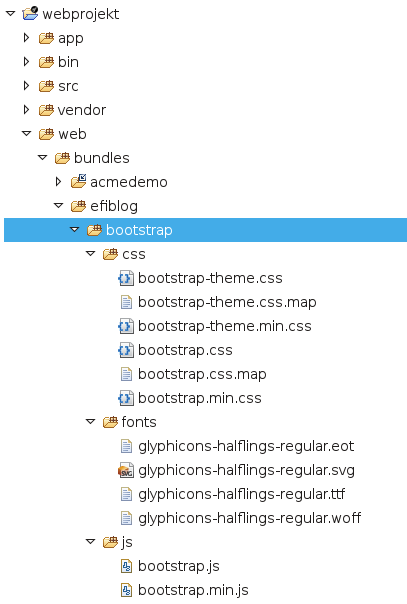
Die Frage in Zeile 22 "Configuration format (yml, xml, php, or annotation)" beantworten wir mit "annotation". Nachdem dieser Schritt erfolgreich durchgeführt wurde, erhalten wir folgende Dateistruktur:
Das heisst es können zahlreiche Eigenschaften dem Framework über die Konsole hinzugefügt werden, wobei
dem Benutzer entsprechenden Fragen gestellt werden und es somit einfach ist schnell Controller, Models und vieles mehr zu erstellen. Wir legen jetzt ein neues Bundle mit dem Namespace Efi/BlogBundle an. Der Suffix "Bundle" ist zwinged notwendig!
Das Kommando lautet hierzu: php app/console generate:bundle --namespace=Efi/BlogBundle
$ php app/console generate:bundle --namespace=Efi/BlogBundle


  Welcome to the Symfony2 bundle generator


In your code, a bundle is often referenced by its name. It can be the
concatenation of all namespace parts but it's really up to you to come
up with a unique name (a good practice is to start with the vendor name).
Based on the namespace, we suggest EfiBlogBundle.

Bundle name [EfiBlogBundle]:

The bundle can be generated anywhere. The suggested default directory uses
the standard conventions.

Target directory [/workspace/webprojekt/src]:

Determine the format to use for the generated configuration.

Configuration format (yml, xml, php, or annotation): annotation

To help you get started faster, the command can generate some
code snippets for you.

Do you want to generate the whole directory structure [no]?


  Summary before generation


You are going to generate a "Efi\BlogBundle\EfiBlogBundle" bundle
in "/workspace/webprojekt/src/" using the "annotation" format.

Do you confirm generation [yes]?


  Bundle generation


Generating the bundle code: OK
Checking that the bundle is autoloaded: OK
Confirm automatic update of your Kernel [yes]?
Enabling the bundle inside the Kernel: OK
Confirm automatic update of the Routing [yes]?
Importing the bundle routing resource: OK


  You can now start using the generated code!
Die Frage in Zeile 22 "Configuration format (yml, xml, php, or annotation)" beantworten wir mit "annotation". Nachdem dieser Schritt erfolgreich durchgeführt wurde, erhalten wir folgende Dateistruktur:
2. Das Standard Twig Layout
Im Ordner src/Efi/BlogBundle/Resources/views erstellen wir jetzt die Datei "layout.html.twig". Diese Datei soll für alle Seiten das Standard-Layout vorgeben.
Für das CSS und JavaScript verwenden wir das Bootstrap Framework welches uns auch "Responsive Design" für Smartphones und Tablets bietet.
2.1 Bootstrap Framework laden und im Ordner web/bundles platzieren
Für unser Bundle legen wir einen Unterordner mit dem Namen efiblog an. Dort wird der geladene Ordner "bootstrap" abgelegt.
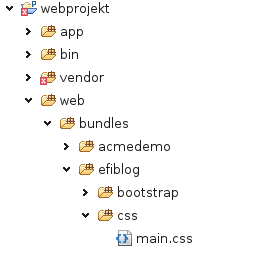
2.2 Eigene CSS Anpassungen
Für unsere eigenen CSS Anpassungen legen wir die Datei web/bundles/efiblog/css/main.css an.
 Der Inhalt sieht wie folgt aus:
Der Inhalt sieht wie folgt aus:
/* file: web/bundles/efiblog/css/main.css */
body {
    padding-bottom: 30px;
    padding-top: 70px;
}
2.3 Twig-Standardlayout einrichten
Die Datei layout.html.twig anpassen.
<!DOCTYPE html>
<html>
    <head>
        <meta http-equiv="Content-Type" content="text/html; charset={{ _charset }}"/>
        <meta name="robots" content="noindex,nofollow" />
        <title>{% block title %}{% endblock %}</title>
        <link rel="stylesheet" href = "{{ asset('bundles/efiblog/bootstrap/css/bootstrap.min.css') }}" />
        <link rel="stylesheet" href = "{{ asset('bundles/efiblog/css/main.css') }}" />
        {% block head %}{% endblock %}
    </head>

    <body role="document">

        <!-- Fixed navbar -->
        <div class='navbar navbar-inverse navbar-fixed-top' role='navigation'>
          <div class='container'>
            <div class='navbar-header'>
              <button type='button' class='navbar-toggle' data-toggle='collapse' data-target='.navbar-collapse'>
                <span class='sr-only'>Toggle navigation</span>
                <span class='icon-bar'></span>
                <span class='icon-bar'></span>
                <span class='icon-bar'></span>
              </button>
              <a class='navbar-brand' href='#'>efi Blog</a>
            </div>
            <div class='navbar-collapse collapse'>
              <ul class='nav navbar-nav'>
                <li><a href='#'>Home</a></li>
                <li><a href='#'>Page 1</a></li>
                <li><a href='#'>Page 2</a></li>
                <li><a href='#'>Kontakt</a></li>
              </ul>
            </div><!--/.nav-collapse -->
          </div>
        </div>

        <div class='container theme-showcase' role='main'>

            <div class='jumbotron'>
                <h1>Der efi Blog!</h1>
                <p>Made with Symfony2 and Bootstrap Framework</p>
            </div>

            <div class='row'>
                <div class='col-md-12'>
                    <!--Body content-->
                    {% block body %}{% endblock %}
                </div>
            </div>

        </div>

        {% block javascripts %}
            <script src="https://ajax.googleapis.com/ajax/libs/jquery/1.11.0/jquery.min.js"></script>
            <script src="/{{ asset('bundles/efiblog/bootstrap/js/bootstrap.min.js') }}" type="text/javascript"></script>
        {% endblock %}

    </body>
</html>
2.4 Die default View anpassen
Damit wir unsere Seite testen können passen wir zum Schluss noch die vom Bundle erstellte Default-View an.
wobei das letzte Wort, in unserem Fall World ein beliebiger Parameter ist.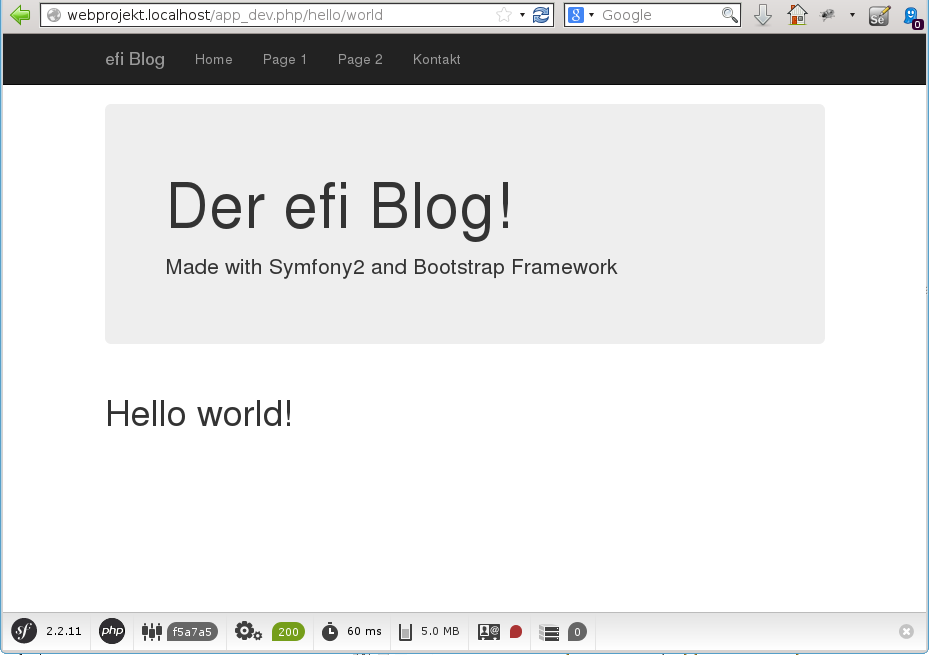
{# file: src/Efi/BlogBundle/Resources/views/Default/index.html.twig #}

{% extends 'EfiBlogBundle::layout.html.twig' %}

{% block title 'Efi Blog' %}

{% block body %}

    <h1>Hello {{ name }}! </h1>

{% endblock %}
ACHTUNG! Das Default-Twig Template erwartet einen Parameter in der URL!
Die URL zum Testen der Seite lautet: http://webprojekt.localhost/app_dev.php/hello/worldwobei das letzte Wort, in unserem Fall World ein beliebiger Parameter ist.
>> Teil 3 statische Seiten
You are a guest
or post as a guest
Loading comment...
The comment will be refreshed after 00:00.
Be the first to comment.